Android) Real-Time Face Detection and Bounding Box Drawing (CameraX, ML Kit)
Android Real-Time Face Detection Example

https://github.com/cornpip/android_face_detection_example
- CameraX - controls the device camera to capture and process images.
- ML Kit - detects faces in the input image and returns bounding boxes.
- Draws the bounding boxes on the preview screen.
CameraX
1
2
3
4
5
6
Camera camera = cameraProvider.bindToLifecycle(
        this,
        cameraSelector,
        preview,
        imageAnalysis
);
CameraX works by composing and binding UseCases according to purpose. (There’s no guaranteed ordering between UseCases.)
preview and imageAnalysis are each configured as independent UseCases.
1
2
3
4
5
6
7
8
9
10
11
private void switchCamera() {
    // If the current camera is the back camera, switch to front; if front, switch to back
    if (cameraSelector.equals(CameraSelector.DEFAULT_BACK_CAMERA)) {
        cameraSelector = CameraSelector.DEFAULT_FRONT_CAMERA;
    } else {
        cameraSelector = CameraSelector.DEFAULT_BACK_CAMERA;
    }

    // Restart the camera
    startCamera();
}
CameraSelector determines whether to use the front or back camera.
1
2
3
Preview preview = new Preview.Builder()
        .build();
preview.setSurfaceProvider(binding.previewView.getSurfaceProvider());
preview is connected to the PreviewView layout defined in the XML file.
1
2
3
4
5
6
7
8
9
10
11
12
13
ImageAnalysis imageAnalysis = new ImageAnalysis.Builder()
        .setBackpressureStrategy(ImageAnalysis.STRATEGY_KEEP_ONLY_LATEST)
        .build();

cameraExecutor = Executors.newSingleThreadExecutor();
imageAnalysis.setAnalyzer(cameraExecutor, imageProxy -> {
    Image mediaImage = imageProxy.getImage();
    if (mediaImage != null) {
        ....
    } else {
        imageProxy.close();
    }
});
setBackpressureStrategy() on ImageAnalysis.Builder sets the strategy for handling incoming frames.
KEEP_ONLY_LATEST: Always keeps only the single most recent frame and drops the rest (some frames are lost).
BLOCK_PRODUCER: Blocks new frames from arriving until the current analysis finishes (every frame gets processed).
For real-time processing, KEEP_ONLY_LATEST is the right choice.
ImageAnalysis and ImageCapture explicitly take an Executor so they run on a separate thread.
ML Kit
1
2
3
4
5
6
7
// Initialize FaceDetector
FaceDetectorOptions options = new FaceDetectorOptions.Builder()
        .setPerformanceMode(FaceDetectorOptions.PERFORMANCE_MODE_FAST) // Set for faster performance
        .setLandmarkMode(FaceDetectorOptions.LANDMARK_MODE_NONE)       // No landmark detection
        .setClassificationMode(FaceDetectorOptions.CLASSIFICATION_MODE_NONE)  // Face detection only
        .build();
faceDetector = FaceDetection.getClient(options);
ML Kit offers a variety of machine learning features, and using its Face Detection API lets you implement face recognition.
Beyond bounding boxes, it can also detect facial landmarks such as eyes, ears, nose, and cheeks,
and it can classify results into categories like “smiling” or “eyes open.”
Bounding Box Draw
1
2
3
4
5
6
7
8
9
10
11
12
13
14
15
16
17
18
19
20
21
22
23
24
25
26
27
28
29
30
31
32
33
34
imageAnalysis.setAnalyzer(cameraExecutor, imageProxy -> {
    Image mediaImage = imageProxy.getImage();
    if (mediaImage != null) {
        InputImage image = InputImage.fromMediaImage(
                mediaImage, imageProxy.getImageInfo().getRotationDegrees());

        faceDetector.process(image)
                .addOnSuccessListener(faces -> {
                    List<RectF> faceRects = new ArrayList<>();

                    for (Face face : faces) {
                        Rect boundingBox = face.getBoundingBox();

                        // Convert coordinates
                        RectF transformedRect = mapCoordinate(
                                boundingBox,
                                new Size(mediaImage.getWidth(), mediaImage.getHeight()), // Original image size
                                new Size(binding.previewView.getWidth(), binding.previewView.getHeight()) // Preview screen size
                        );
                        Log.d(TAG, String.format("%s => %s", boundingBox.toString(), transformedRect.toString()));

                        faceRects.add(transformedRect);
                    }

                    runOnUiThread(() -> {
                        binding.faceOverlay.setFaceBoundingBoxes(faceRects);
                    });
                })
                .addOnFailureListener(Throwable::printStackTrace)
                .addOnCompleteListener(task -> imageProxy.close());
    } else {
        imageProxy.close();
    }
});
Once faceDetector returns a face detection result, the bounding box for each face comes back as a Rect object.
This Rect represents coordinates relative to the camera’s original image resolution.
For example,
if the raw resolution obtained from the camera sensor is 640x480,
and the preview resolution showing the captured image is 1440x1440,
then the Rect returned by faceDetector is expressed in 640×480 coordinates.
The Rect from ML Kit’s faceDetector is positioned relative to 640x480.
So, to display the bounding box on the preview, you need to convert the coordinates by calculating the resolution ratio and offset.
1
2
3
public RectF mapCoordinate(Rect imageRect, Size imageSize, Size previewSize) {
    ...
}
The following function adjusts the bounding box from the original image to fit the PreviewLayout.
mapCoordinate (Coordinate Conversion)
CameraX provides the following ScaleTypes:
FIT_CENTER/START/END
FILL_CENTER/START/END
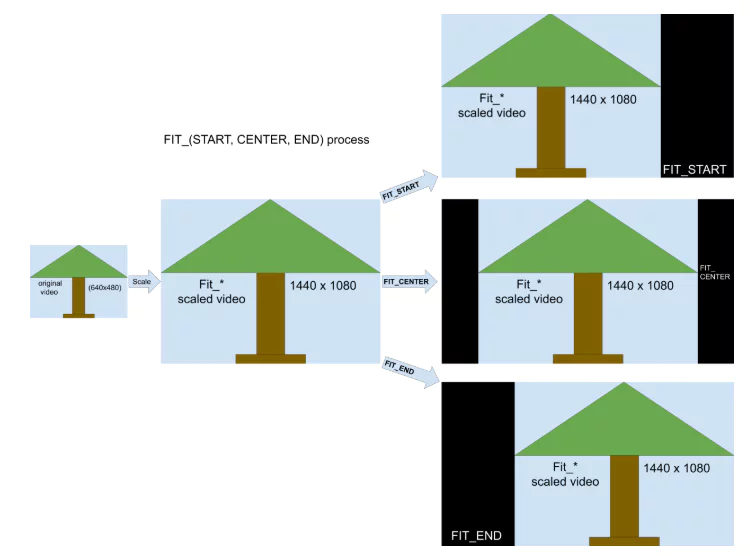
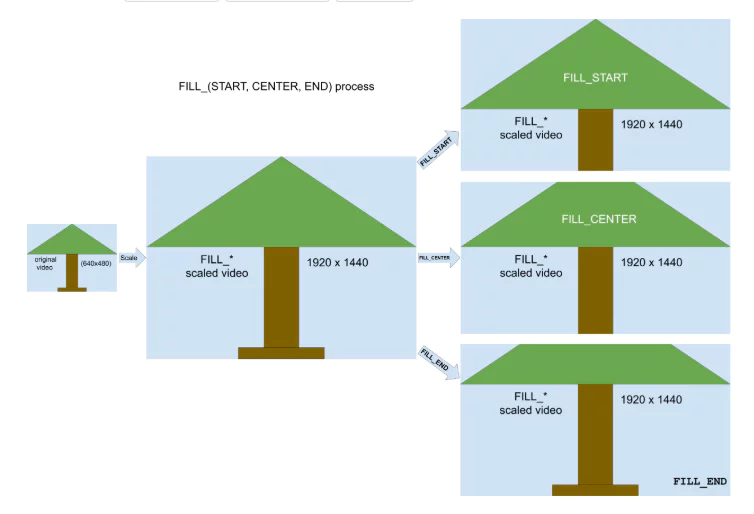
The behavior of each ScaleType is easy to grasp at a glance from the image examples in the official documentation.
The default is FILL_CENTER, and in this example it’s explicitly set via an XML attribute.
Let’s look at the following two settings in this example:
- FILL_START
- FILL_CENTER
ScaleTypes in the FILL family scale the image up or down to fill the view’s size, cropping whatever overflows.
FILL_START: Aligns based on the starting point of the image, typically cropping the bottom or right side.
FILL_CENTER: Aligns based on the center of the image, potentially cropping both top/bottom or both left/right sides.
1
2
3
4
5
6
7
8
9
10
11
12
13
14
float viewAspectRatio = (float) previewSize.getWidth() / previewSize.getHeight();
float imageAspectRatio = (float) imageSize.getWidth() / imageSize.getHeight();

float scaleFactor;
float postScaleWidthOffset = 0;
float postScaleHeightOffset = 0;

if (viewAspectRatio > imageAspectRatio) {
    scaleFactor = (float) previewSize.getWidth() / imageSize.getWidth();
    postScaleHeightOffset = ((float) previewSize.getWidth() / imageAspectRatio - previewSize.getHeight()) / 2;
} else {
    scaleFactor = (float) previewSize.getHeight() / imageSize.getHeight();
    postScaleWidthOffset = ((float) previewSize.getHeight() * imageAspectRatio - previewSize.getWidth()) / 2;
}
If viewAspectRatio is larger, it means the preview’s width ratio is greater than the original image’s width ratio.
Conversely, if imageAspectRatio is larger, it means the original image’s width ratio is greater than the preview’s.
For example, consider the following setup:
Preview: 1440x1440
Image: 640x480
viewAspectRatio: 1
imageAspectRatio: 1.33333
In this case, scaleFactor is calculated as 1440/480 = 3.
In other words, since the image’s width ratio is larger than the preview’s, the image’s height (the shorter side) is scaled up to match the preview’s height.
If you scaled to match the longer side instead, you’d get FIT behavior with empty space; matching the shorter side gives you FILL behavior with the image cropped.
FILL_START
1
2
3
4
5
Matrix matrix = new Matrix();
matrix.setScale(scaleFactor, scaleFactor);
if (cameraSelector.equals(CameraSelector.DEFAULT_FRONT_CAMERA)) {
    matrix.postScale(-1, 1, previewSize.getWidth() / 2f, previewSize.getHeight() / 2f);
}
Multiply by scaleFactor with no offset, then apply a horizontal flip if it’s the front camera.
FILL_CENTER (the logically expected calculation)
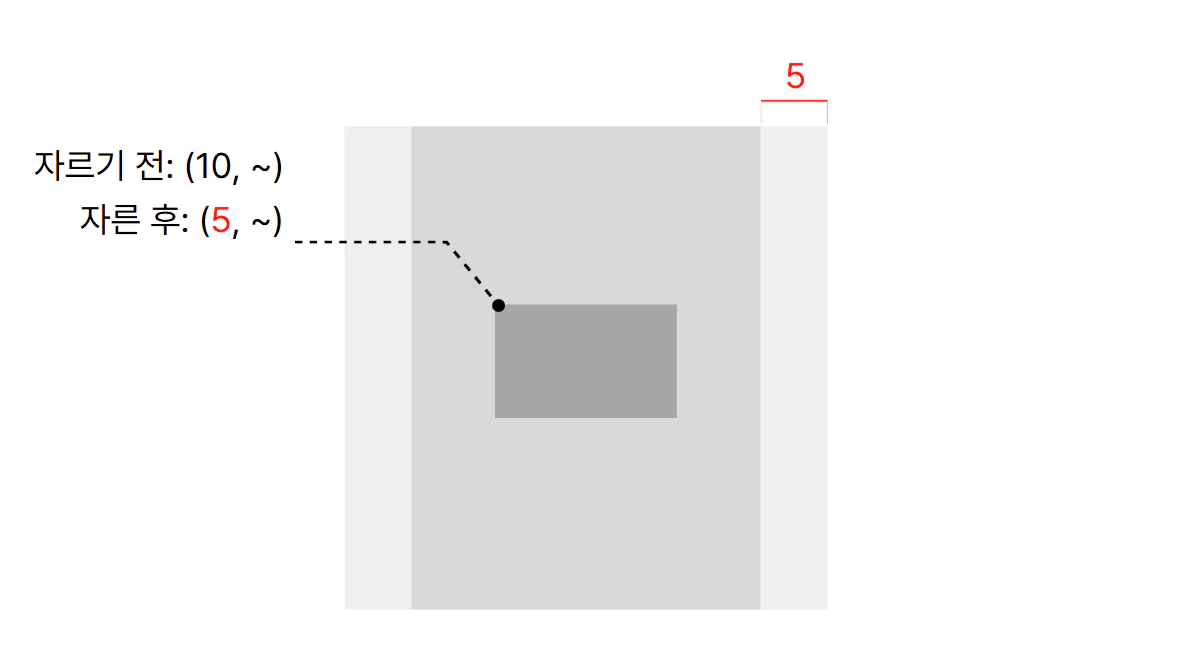
Before cropping, the box was positioned at (10, ~).
After cropping, it ends up looking as if it were at (5, ~).
With FILL_CENTER, this is equivalent to applying an offset equal to half the overflow amount.
Here’s the derivation of the formula for the offset:
1
2
3
4
5
6
7
8
9
10
11
12
// viewAspectRatio <= imageAspectRatio
scaleFactor = viewHeight / imageHeight
scaledImageWidth = imageWidth * scaleFactor
                 = imageWidth * (viewHeight / imageHeight)
                 = viewHeight * (imageWidth / imageHeight)
                 = viewHeight * imageAspectRatio

cropWidth = scaledImageWidth - viewWidth
          = (viewHeight * imageAspectRatio) - viewWidth

postScaleWidthOffset = cropWidth / 2
                     = ((viewHeight * imageAspectRatio) - viewWidth) / 2
Preview: 1440x1440
Image: 640x480
viewAspectRatio: 1
imageAspectRatio: 1.33333
scaleFactor = 1440/480 = 3
postScaleWidthOffset = (1440 * 1.333 - 1440) / 2 = 240
1
2
3
4
5
6
Matrix matrix = new Matrix();
matrix.setScale(scaleFactor, scaleFactor);
matrix.postTranslate(-postScaleWidthOffset, -postScaleHeightOffset); // off-set
if (cameraSelector.equals(CameraSelector.DEFAULT_FRONT_CAMERA)) {
    matrix.postScale(-1, 1, previewSize.getWidth() / 2f, previewSize.getHeight() / 2f);
}
With FILL_CENTER, the preview and image centers already coincide even before applying the offset, but with a different ScaleType they might not.
In such cases, the order in which you apply the offset and the horizontal flip affects the result.
FILL_CENTER (the calculation that actually draws the box correctly)
The calculation in the previous section doesn’t look wrong, but it draws the box in a position that doesn’t match the actual face location.
1
2
3
4
5
6
Matrix matrix = new Matrix();
matrix.setScale(scaleFactor, scaleFactor);
matrix.postTranslate(-postScaleHeightOffset, -postScaleWidthOffset);
if (cameraSelector.equals(CameraSelector.DEFAULT_FRONT_CAMERA)) {
    matrix.postScale(-1, 1, previewSize.getWidth() / 2f, previewSize.getHeight() / 2f);
}
After trying a few things, I found that swapping in heightOffset for the x-axis and widthOffset for the y-axis draws it in the correct position.
I’m not sure why.
Also, all the examples (FILL_START/CENTER) only draw the box in the correct position when the preview size has a 1:1 aspect ratio.
I don’t know why it only lines up correctly at a 1:1 ratio either.
Reference Links
https://developer.android.com/media/camera/camerax/preview?hl=ko#scale-type
https://developers.google.com/ml-kit?hl=ko
https://developers.google.com/ml-kit/vision/face-detection/android?hl=ko
https://github.com/googlesamples/mlkit/tree/master/android/vision-quickstart