Canon EOS 6D Review as a Beginner Camera: Getting Started with DSLRs and Shooting Basics
My First Camera
Last August, I bought a camera for the first time.
The body is a Canon EOS 6D.
Basic specs: DSLR, full-frame, about 20.2 megapixels (≈ 5472 × 3648)
I bought it used, along with a lens.
The lens is a Tamron SP 24-70mm F2.8 zoom.
I’d like to share a few things about the camera along with my impressions from using it so far.
DSLR vs. Mirrorless
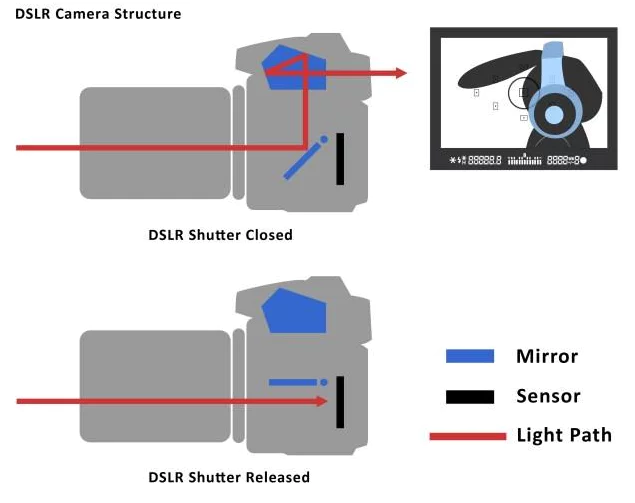
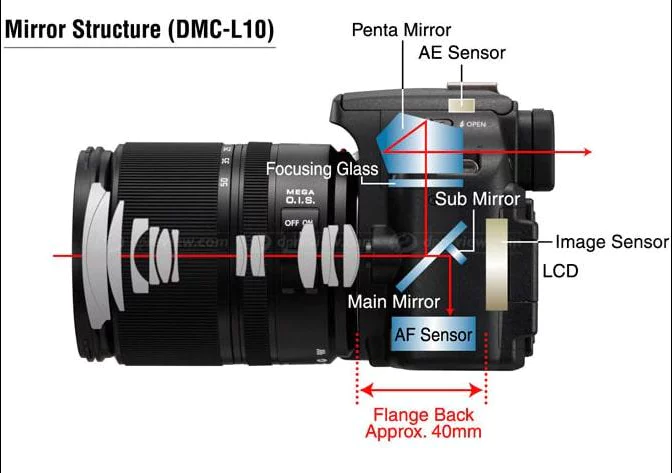
A DSLR reflects the light coming through the lens off a mirror so you can view it directly through an optical viewfinder.
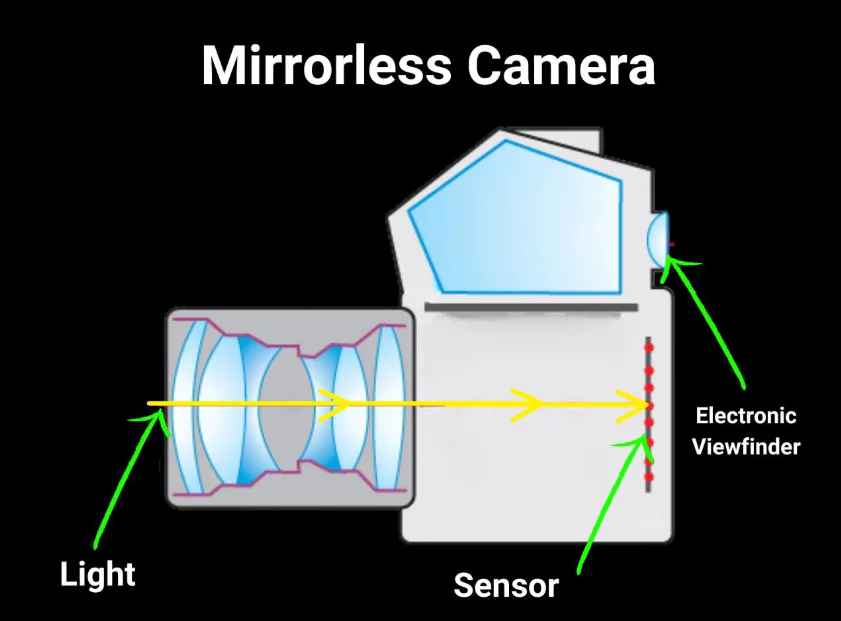
In a mirrorless camera, the light coming through the lens goes straight to the image sensor, and the image the sensor produces is shown on an electronic viewfinder.
DSLR Era (2003 ~ 2016)
DSLRs used to be the mainstream choice.
Optical Viewfinder (OVF)
A DSLR passes the light coming through the lens straight to your eye via a mirror and prism.
This means there’s no lag, and you see the actual scene with no color distortion.
AF Performance
DSLRs have a dedicated phase-detection AF sensor separate from the image sensor, which gave them fast, reliable focusing.
Mirrorless Era (2022 ~ )
Early mirrorless cameras fell short in electronic viewfinder (EVF) quality and AF performance.
But advances in sensor and display technology have gradually closed that gap.
Electronic Viewfinder (EVF)
Resolution has gone up and lag has become nearly imperceptible,
and you can preview exposure and color results before you even shoot.
Sensor-Based Phase-Detection AF
DSLRs relied on a separate AF sensor, but
mirrorless cameras embed PDAF pixels directly inside the image sensor.
※ PDAF = Phase Detection AutoFocus
AI-Based Tracking
e.g., face, eye, and object recognition/tracking
Some of this is available on DSLRs too, but
mirrorless cameras have an edge here since they work directly off the sensor image.
In the end, DSLRs were optical, photo-centric cameras,
while mirrorless cameras have established themselves as sensor-based, integrated (photo + video) cameras.
Today, mirrorless dominates the camera market.
Lenses
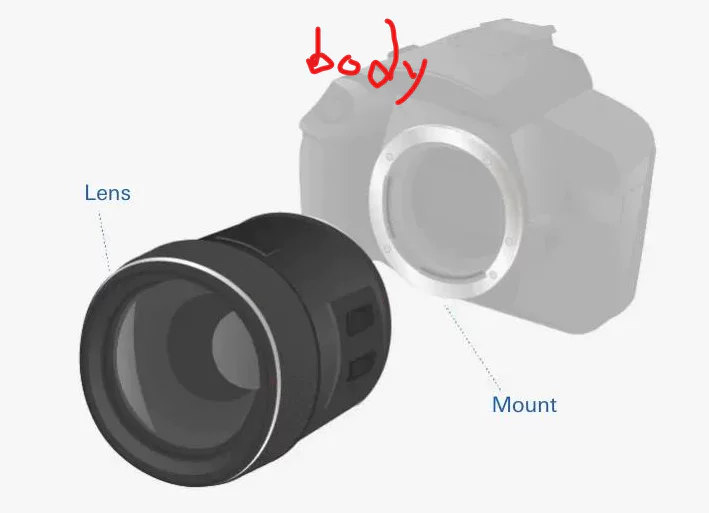
To get started with a camera, you need both a body and a lens.
A lens will fit as long as its mount matches the body’s mount.
The EOS 6D uses an EF mount.
If you search for lenses, you’ll see names like
“Tamron SP 24-70mm F2.8 Di VC USD G2 A032 for Canon EF”
“Canon EF 50mm F1.8 STM”
“Canon EF 100mm F2.8 L MACRO IS USM”
— all containing the word “EF”.
Zoom Lenses vs. Prime Lenses
If a range of focal lengths is listed, like 24-70mm, it’s a zoom lens.
If only a single focal length is listed, like 50mm, it’s a prime lens.
Zoom lenses have both a zoom ring and a focus ring,
while prime lenses have only a focus ring.
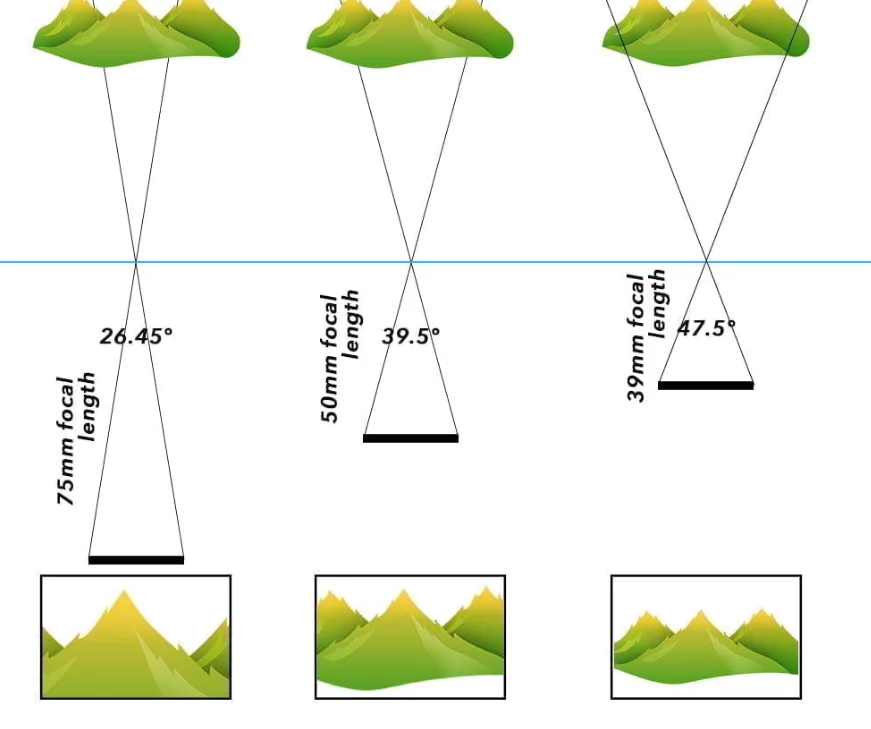
The zoom ring changes the focal length,
and the field of view (FOV) changes depending on the focal length.
Focal length ↑ → FOV ↓ → telephoto (more zoomed in)
Focal length ↓ → FOV ↑ → wide-angle (broader view)
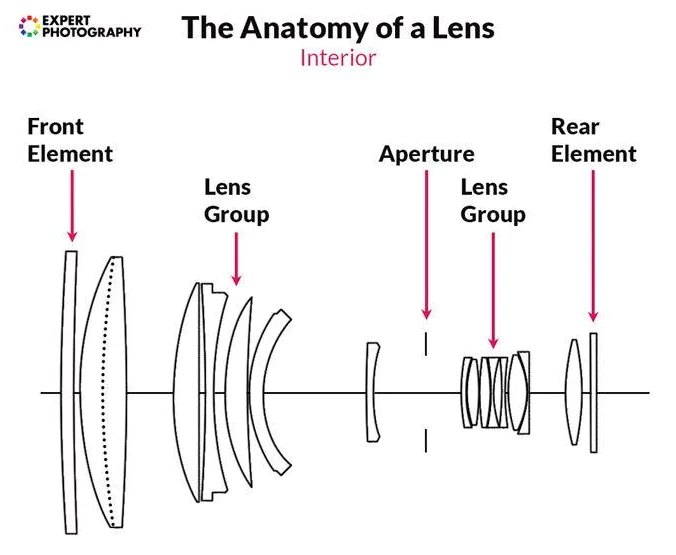
The focus ring moves some of the internal lens elements back and forth
to bring a subject at a particular distance into focus.
Shooting
Shooting Modes
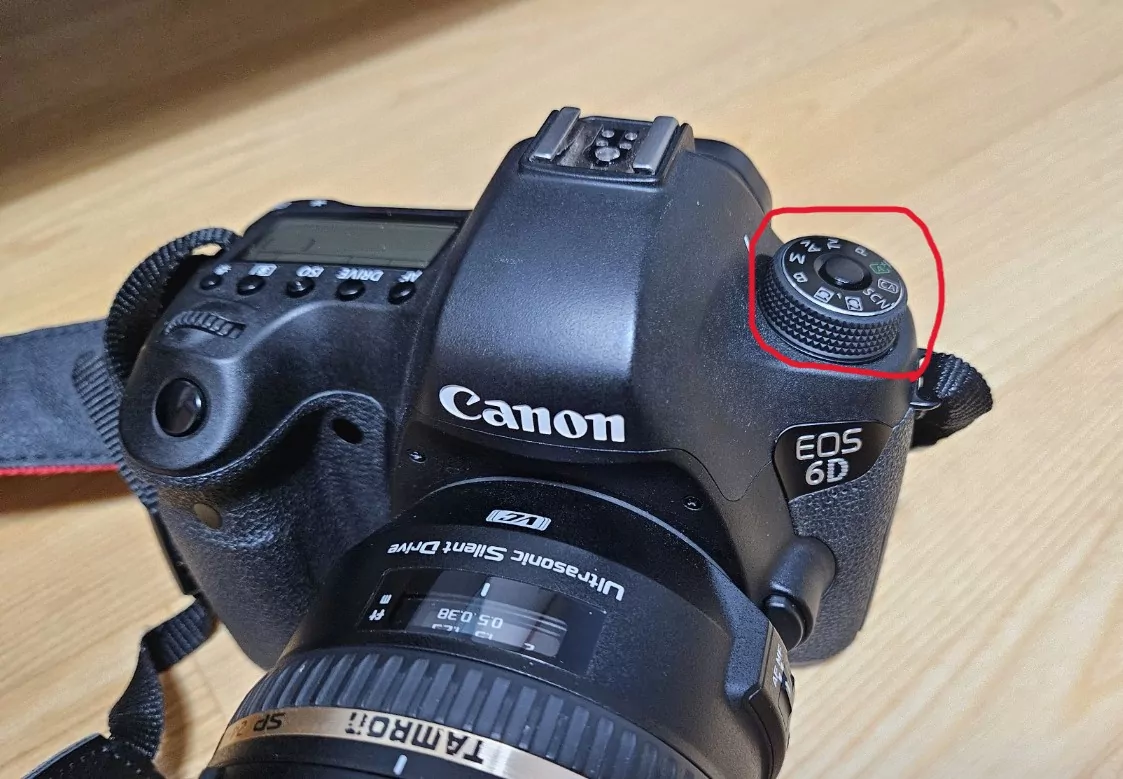
Tv Mode\
- I set the shutter speed, the camera sets the aperture\
- When I adjust the shutter speed → the camera changes the aperture to match the brightness.
Av Mode\ - I set the aperture, the camera sets the shutter speed\
- When I change the f-number → the camera changes the shutter speed to match the brightness.
P Mode\ - The camera decides both shutter speed and aperture
M Mode\ - I decide both shutter speed and aperture
Aperture
- f-number (f-stop), Aperture
- f-number ↓ → aperture ↑ (more open)
- f-number ↑ → aperture ↓ (more closed)
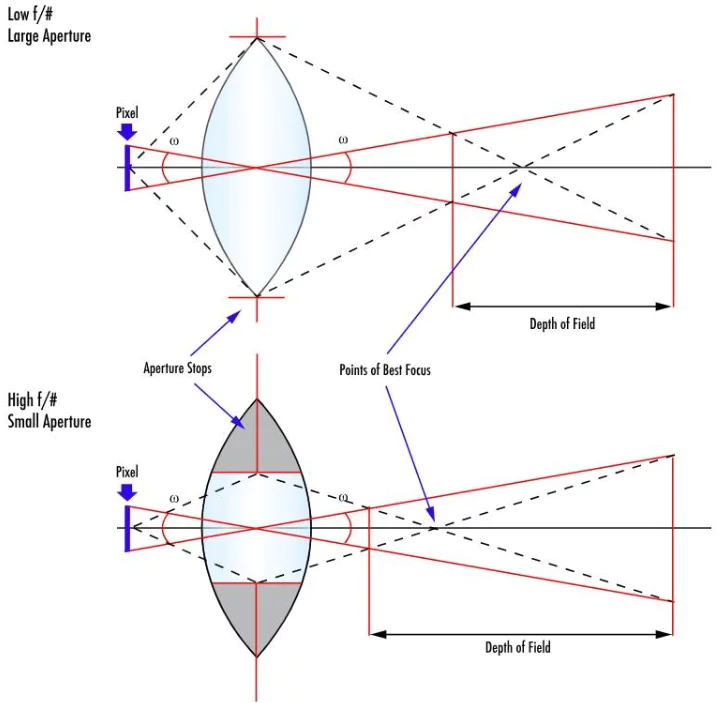
The more you stop down the aperture, the wider the range of acceptable focus error becomes at a given standard,
so a larger area (DOF) appears sharp. This is called a deeper depth of field.
Why does stopping down the aperture widen the acceptable focus error range?
To understand this, let’s look at a concept called CoC (Circle of Confusion).
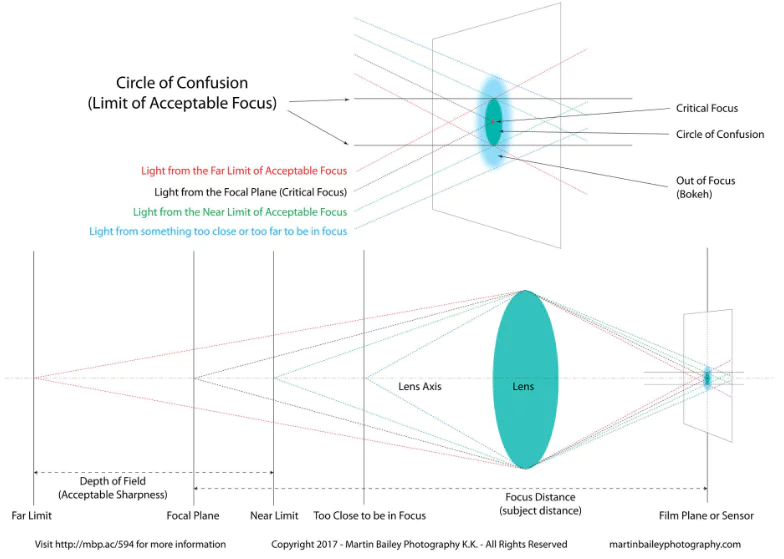
When focus is exact, light arrives at the image sensor as a point (shown as the black line above).
When focus is slightly off, it arrives as a small blur circle instead.
If the size of this circle is below an acceptable threshold, it’s considered sharp.
For example, a blur with a CoC of 0.03mm or smaller falls within the range the human eye perceives as sharp.
So DOF isn’t a hard physical cutoff — it’s a concept defined by the range humans perceive as sharp.
Coming back to the original question — why the acceptable focus error shrinks or grows:
When the aperture is wide open,
light enters through the top and bottom edges of the lens too → a wider spread of ray angles → even a small focus error spreads a lot on the sensor → larger CoC → shallower DOF
When you stop down the aperture,
only rays near the center get through → a narrower spread of ray angles → even with a focus error, the spread on the sensor is smaller → smaller CoC → deeper DOF
In short,
the aperture narrows the range of angles of light rays passing through the lens, and as a result, even with some focus error, the CoC on the sensor stays small, giving a deeper DOF.
ISO
ISO represents how sensitive the sensor is to light.
Raising the ISO makes photos brighter under the same conditions.
However, this isn’t about receiving more light — it’s about amplifying the signal the sensor already captured.
So raising the ISO lets you shoot in darker environments, but it also increases noise.
Shutter Speed
This is how long the sensor is exposed to light.
1/1000 sec → very fast
1/60 sec → normal
1 sec → very slow
Shutter speed ↑ → less time receiving light → darker
Shutter speed ↓ → more time receiving light → brighter
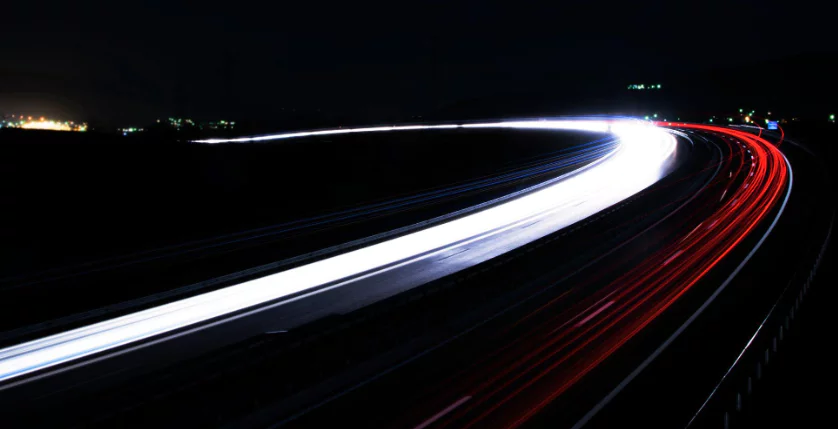 Shooting with a slow shutter speed leaves motion trails.
Shutter speed also determines how finely the subject’s motion is sliced up over time.
If the shutter is fast enough, it can slice motion into small enough increments to capture it as if frozen,
while a slow shutter accumulates motion into a single continuous trail.
Also, even if the subject is stationary,
you need to keep the shutter speed above a certain minimum to account for camera shake and the subject’s subtle movements.
EOS 6D: My Experience So Far
I usually take the camera out on days off, take some photos,
then come home and upload them to my photo management platform.
Scrolling through the photos afterward,
I often think “next time I should try shooting it this way” — and that process itself is pretty enjoyable.
2025.10.03 - PhotoPrism: A Personal Photo Cloud / Photo Management Platform
At first, I’d try to fix things I missed while shooting using editing software,
but since that took a lot of effort, I gradually did less and less post-processing of the originals. In the end, my mindset shifted to “just get it right in-camera.”
What I Find Lacking
- Weight
The Canon EOS 6D body weighs about 755g,
and the Tamron 24-70mm (A007) weighs about 825g,
so with the camera bag included, it feels like you’re carrying almost 2kg around.
Carrying just the camera bag alone is fine,
but putting the camera inside a backpack, or
carrying a backpack plus a camera bag together, gets tiring…
So I’ve been considering getting a prime lens.
For example, the Canon EF 50mm f/1.8 STM weighs only about 160g — more than 5 times lighter than the zoom lens I’m currently using.
\
- AF
One issue is AF speed.
Because of how DSLRs are structured, there’s a difference between the two shooting modes:
Viewfinder → uses the phase-detection AF sensor (fast)
Live View → AF via the image sensor (= contrast AF) (slow)
Viewfinder AF has One Shot / AI Focus / AI Servo modes.\
- One Shot: focuses once and locks\
- AI Servo: continuously refocuses while the shutter is half-pressed (tracking)\
- AI Focus: starts as One Shot → automatically switches to Servo if needed
Live View AF has AF / AF Live / AF Quick modes.\ - AF: focuses on the selected point\
- AF Live: face detection + tracking, or focuses on the selected point if no face is found\
- AF Quick: flips the mirror down to use phase-detection AF (fast, but the display blacks out momentarily)
Shooting through the viewfinder means you have to hold the camera up to your eye, which limits your framing options,
and to check exposure changes from shutter speed or aperture, you need to look at Live View.
You can actually check exposure changes via the light meter in the viewfinder too, but only in M mode.
In Tv/Av mode, the light meter isn’t just for monitoring — it’s a control element.
Adjusting the meter changes the target exposure, and the camera automatically adjusts the shutter speed or aperture to match.
You can adjust the meter with the control dial while the shutter is half-pressed.
In short,
shooting through the viewfinder feels fine,
but AF speed feels frustratingly slow when shooting via the screen (Live View).
Another issue is the AF points.
Looking through the viewfinder, there are about 11 AF points.
When using automatic AF across all 11 points,
if the subject is off-center, it often doesn’t focus the way you’d expect.
So I tend to select a specific AF point manually instead.
I happened to see the Live View screen of another camera once,
and watching it focus in real time across the entire frame really drove home how different the AF systems are on newer cameras.
Wrapping Up
Discovering and cultivating your own tastes is an important part of life.
A camera is a fascinating tool — and process — where optical, electronic, and mechanical elements all come together, along with the judgment calls you make while shooting and the taste reflected in the final result.
There’s a lot of room to develop your own taste through it, and a piece of your life naturally gets recorded along the way.
I’m very happy that I got into photography last year.